Wednesday, November 17, 2010
Week 4 Final Video Option 1
I work in a technology department and part of my job is promoting technology integration into curriculum. One of the biggest hurdles that I encounter all the time is tendency for teachers to refuse to embrace technology, either out of fear or the desire to keep the status quo. There is always a struggle in our district to get teachers to embrace technology and see the need for training and the effort to stay current. This video addresses that problem.
Tuesday, November 16, 2010
PE9_Creaza
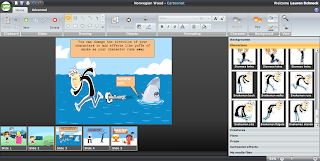
After you have created the bulk of your characters and added text or thought and speech bubbles, you can move on to manipulate your cartoon or add extra things like props. The props tab contains random items like a stool, a pizza, a barn, or a mushroom cloud. These props can be added to move your story along. Props are added just like the characters and actions, by simply dragging and dropping a desired prop onto your slide. You can resize the prop just like the other elements by dragging the handles inward or outward. You may notice that your slide is getting rather crowded and you might wish to rearrange your elements in layers. You can do this by clicking on your item so it is selected and then going to the arrange tool in the tool bar. When you click on arrange an drop down list of options appears and you can choose to move your item to the back or the front of the layers of items on your slide. Another feature effect you can use is to change your slide from a day scene into a night scene by clicking on the background mood tab in the tool bar. You can also change the mood of your character by selecting the character and then choosing from the character moods tool out of a list of happy, sad, normal, or angry. You can also change the opacity of any object or character by selecting that object and clicking on the opacity tool in the objects palette. You can set the opacity to various levels ranging from ten percent to one hundred percent.
PE8_Creaza
The Next step in making your cartoon with Creaza is to add and manipulate characters. You can choose from characters portrayed in different positions, actions, or directions. Just like choosing backgrounds you must click, drag and drop your characters on to your slide. Once your character is placed on the slide you will see that a box with handle spots appears around your character. Those handles allow you to resize your character by dragging it outward or inward to make it larger or smaller. You can also change the direction of your character by pulling the handles all the way to the opposite side which will flip the character horizontally. After you have added a character you can click on the creatures tab and add an animal or a non-descript creature to your slide. Creatures are manipulated in the same way that characters are. You can add text boxes to your slide to offer the storyline of your cartoon, or you can add thought bubbles to your characters to allow them to “think” out your story, or a “speech” bubble to have your characters talk with text. You can change the font, size, and color of your text by clicking in the formatting palette. You can also change the background color of your text boxes and thought bubbles. You can also draw your own objects with the line tools, rectangle tools, elipse tool, and the free hand pen tool. You can also add cartoonist effects by clicking on the cartoonist effects tab and dragging and dropping actions so to speak onto your slide. An example of this would be the puff of smoke behind a character to portray the character running away.
PE7_Creaza
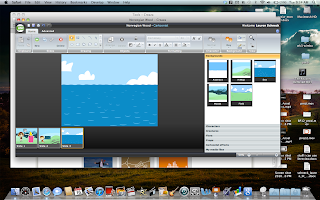
I chose to work with Creaza. Creaza is a media creation tool that provides the user with tools to make movies, cartoons, audio projects, or mind maps. I chose to use the cartoon creating tool. The cartoon tool allows the user to choose from pre-made backgrounds, characters actions, and objects to tell a story. Creaza is a web based tool that enables the user to accomplish creative story telling anywhere that they can find an internet connection. This tool combines professionally made content with the user generated content to produce a unique piece aimed at telling a story. The user has a lot of choices when it comes to the desired style of the cartoon. There are themes varied from historic, classic, crazy or manga. Creaza reguires signing up for an account with a username or password. Once you have created an account you can choose your theme and begin creating your cartoon. After you have chosen your theme you will see that the cartoon editor window has a tool bar at the top and content choices on the right. I started by clicking on the backgrounds tab and dragging and dropping a back ground on the empty slide in the center of the editor. If you change your mind about the background choice you can simply drag and drop another background over top of your current background and the new one will replace it. Once you have chosen a background you can click on the characters tab and add a character to your cartoon.
Monday, November 15, 2010
PE6_Garageband
This is an example of a podcast that has narration, music, photos, a chapter marker, a url title, and hyper linked text that will take the audience to web content based on my topic. The only problem I have is that I tried for hours to upload my original podcast, but blogger kept timing out and would not process my podcast. I finally decided to post it to viddler and then embed it here. Unfortunately that means that my linked url will not work since the video has been put in a wrapper by viddler.
PE5_Garageband
After going through the tutorials, another feature of podcasting that I have learned in keeping with the information in the track editor, is the concept of adding urls within the podcast. In addition to chapter markers, pictures can have a hyperlinked text added to them that take the listener to a particular webpage. This can be useful to give your listener more to explore beyond what you are talking about. Your listener can click on your links and look at other photos, information or they can simply research your topic in more depth on their own time. It is fairly simple to add linked text. First you must click on the picture represented in the track editor that you would like to ad a link to. If you scroll to the right of the chapter markers section you will see a section called "url title." To the right of that box is the "url" box. You can use the title box to give your link a name. You might want to name it something to inform your listener that they can click on the title to bring them to a web page. After you have given your link a name, click enter to finalize your title. Then scroll to the right and click inside the "url" box. In this box you can paste your copied web link or simply type the link into the box and click enter. Now when you export your podcast, your listener will see your url title at the bottom of the picture you have attached it to. Your listener can then click on the url title and navigate to the web content you have decided to add to your podcast.
PE4_Garageband
One of the things that I learned about garageband and making podcasts is the concept of making chapter markers. If you plan to use garageband to record a lecture for example, you may want to add chapter markers to let your listener know what topics you will be talking about in different sections of the podcast. Chapter markers allows you to notate sections of your podcast and label them so the listener may jump from one topic to another through your podcast. Adding a chapter marker is pretty simple to do. Chapter titles are linked to the images that you place in your podcast. Because of this fact you may want to choose a different image for each chapter so it will be quick and simple to identify the beginnings of new chapters. To add a chapter marker simply click on your photo in the podcast track. You will see that in the track editor below your media tracks the information for your pictures and the podcast track will appear. You will see that there are sections labeled "time", "artwork" and "chapter title." In the "chapter title" section you can click on the "chaper title" text and type your own unique title that corresponds with the image you have selected. Hit enter when you are finished and now that section of your podcast has its own title. You can continue the process with as many or few chapter titles as your would like. After you export your podcast your listener will be able to identify your chapter markers in iTunes.
Friday, November 12, 2010
BP12_OMM_Prezi
Prezi is a web based presentation tool that allows you to create and archive your presentations within your web browser. An account is needed to use this tool, but once you have made an account you can store and access all your presentations any place that you have internet access. Prezi works by simply clicking to add text. While zooming in and out of your canvas you can place your content anywhere you would like. You can also add images and frames to your content. Once your content is placed you can create a path of navigation through your content items. Finally you can play your slideshow with a simple mouse click.
BP9_Spell with Flickr
Sunday, November 7, 2010
PE3_iMovie
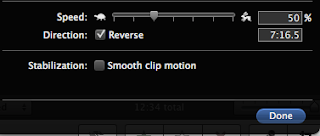
Another small feature that makes a big difference is also in the "clip adjustments" tab, which again, can be accessed by clicking on the small gear in the lower left hand corner of each video clip. The clip adjustment tab houses the controls for speed and direction of each clip. These controls offer quick click changes that make a big difference in the overall outcome of a clip. The speed control is a slider bar that goes from turtle to rabbit. The imagery is self-explanatory, offering the option to slow down a clip, or to speed up a clip until the desired effect is reached. The speed of motion is a hallmark of video editing, and it offers the option to evoke emotion, or mimic professional broadcast television. Clips in slow motion offer the "instant playback" quality of sports casts, while the slow motion option gives video a much more emotional feel, often used in wedding videos, or commercials about joining a cause like sponsoring children, fighting diseases, or animal rescue efforts. No matter what the desired outcome of a video message, having control of the speed of individual clips can provide a whole new world of options. Another control which greatly enhances the editors options is the "direction" option. Direction, when checked, plays the clip in the reverse order. This can be used as a story telling devise, or as a unique way to display video that is almost always going in a forward direction. Some examples of this might be video of water, or other elements that usually only behave in one way.
PE2_iMovie
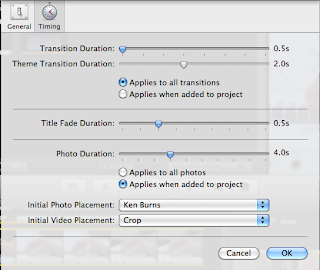
One of the features of iMovie that allows for some of the functionality that iPhoto offers is the automation of slideshow parameters. The tutorials point out that slideshows are not just limited to iphoto. If you are working on some video clips and you would like to add photos in a slide show format, you can easily create a slideshow for your photos right inside your imovie edit workspace. You can certainly customize the properties of each photo, but if you would like to set a fixed timing for your slideshow you can do that with in the "project properties" settings. If you right click on your project media in the project library, you will see the option to enter the "project properties" tab. Once you click on that tab you will see the familiar theme picker window noting which theme your project is set to, if any. At the top of that window you will see another option labeled "timing." If you click on this option you will see a dialog window that displays all of the options for the overall parameters of your project. You will see options for "transition duration, Theme transition duration, title fade duration, photo duration, initial photo placement, and initial video placement." You can set the master controls, so to speak for all of these elements in this preference window. From this small list of controls you can be certain that every photo you add will have the length and transitions you desire, without having to address each photo individually. You can also do a global change to the properties of your media elements all in one place.
PE1_iMovie
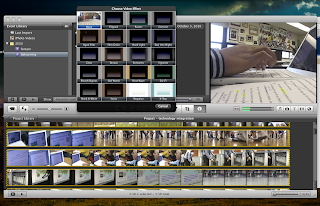
I feel that I have a pretty good understanding of iMovie, but I know there is always an opportunity to learn more. I think the the customization of individual shots, in terms of their image quality and effects is the one thing that most people don't realize that iMovie can do. The tutorials pointed out some of the customization options that iMovie has to offer. Each clip in the event browser has a little gear in the bottom left hand corner of the beginning of the clip. If you click on that gear you will get options to change the properties of the clip you have currently selected. If you click on the "video adjustments" option you will get an inspector window with a host of other options. In the inspector you can click on the "clip" tab, which will bring up another set of controls for the properties of the specific clip you have selected. Once you are there, you can click on the "video effect" drop down list and you will see that twenty options appear in small preview windows. These options apply video effects on your selected clip. The effects available are "flipped, raster, cartoon, aged film, film grain, hard light, day into night, glow, dream, romantic, vignette, bleach bypass, old world, heat wave, sci-fi, black and white, sepia, negative, and X-ray." You can apply those affects, see how you like them and unapply them very easily by just clicking back and forth between the effects and the "none" option which will return your clip to it's normal properties. These effects can create a whole other mood to your video clips. They can in many cases, serve to move your story, or point forward, by creating a specific feeling, or atmosphere for your video.
BP8_Animoto
Animoto is a slideshow creation tool. It can be used by anyone who would like to make high quality slideshows with just a few clicks. Animoto uses photos uploaded from your desktop, arranged in the format of your choosing. You can add text, themes and music all within the applications user interface in the browser. Once you are finished you can publish your slideshow to the web as well as archive it within your Animoto user account.
BP5_Google Sites
I would like to discuss Google sites. My district recently went Google with our mail, in addition to opening Google docs, video and sites. This was a big transition for all of our teachers and staff. They are very used to doing things a certain way and the change was not easy. That being said, most are very enthusiastic about using Google as our mail provider. They find it convenient since it can be used from anywhere, and helpful because of it’s many useful features.
Since they have made the transition and are familiar with Google’s approach, I would like to eventually introduce the use of Google sites for use in the classroom. Wiki’s have proven to be an invaluable resource when it comes to collecting and sharing useful information, as well as sharing user created content, tools and ideas. I think that Google sites would be an excellent tool for teachers to use in order to implement personalized learning This tool would also allow me to personally tailor my instruction to teachers themselves.
I think that Google sites will provide a streamlined way for teachers to begin their content sharing journey because it will not require another user name and password in our district to use it. The teacher email accounts, Google doc accounts, Google video and sites are all linked to their user name and password. It seems like a small thing, but having one password and user name and being able to get to Google sites from inside their email windows is a big issue in our district. It can mean the difference between using a tool or not.
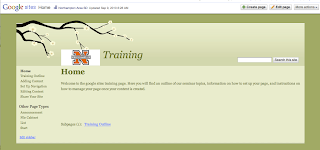
This tools works very much like a wiki in that it has an edit mode and a save mode. Content can be added by embedding it into a page or by simply linking it to other pages. Multimedia can be added as well as images, or audio.
Google sites can act as personal website for a teacher or as a collection place for user generated content, tools, ideas or anything that pertains to their purpose. This tool meets the requirements of presence, modification, user-generated content, and social participation. It is very present in my district, being a click away from their daily mail site. It’s entire purpose is for continual modification, and all of it’s content is user generated. Social participation is definitely the main function of this tool.
Monday, November 1, 2010
Saturday, October 30, 2010
BP4 Web 2.0 Tools
Xtranormal
I am not a teacher, but I work with teachers to integrate technology into their classrooms. I often plan and deliver training sessions to teachers themed on various technology tools. One of the web tools that I could use both in my own presentations and as course material to introduce teachers to, would be xtranormal. Xtranormal is an automated animated movie generator that allows users to create their own animated stories, presentations or other types of media with simple clicks and typing text. Xtranormal has premade sets, characters and movements that can be utilized to tell a unique story or present information in an unusual and engaging way.
I can use this tool to introduce the concept of animation tools or I can use it to tell a story that explains a totally different concept. I think that movies made with xtranormal can be a fun attention grabbing tool to gain audience interest in the seminars.
In the classroom I can see students using this as vehicles for presentations, as a story telling tool, or as a way to act out information to enhance clarity or explore the possibilities or limitations of a subject. For instance students could act out the roles of a refugee in an occupied country, or explore the social interactions of other cultures. Teachers can use Xtranormal to explain historical events, or conduct interviews.
Overall, I think this tools is only limited by imagination, and it can be added to the list of useful classroom aides that can help achieve differentiated instruction.
Friday, October 29, 2010
BP1_Welcome to my blog
Welcome to bravo Bucket!
Subscribe to:
Posts (Atom)
